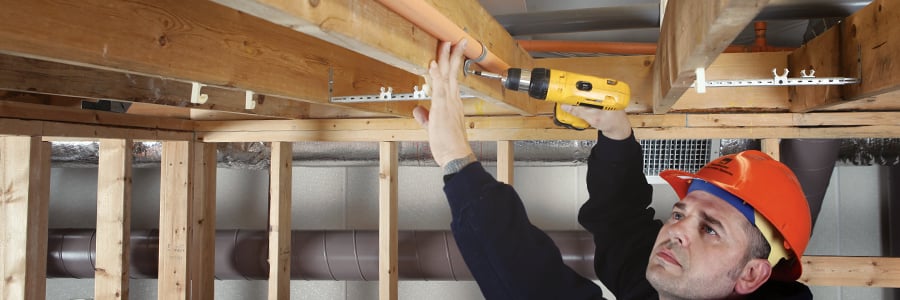

BlazeMaster® pipe and fittings are scientifically designed to be strong and durable, and hangers are critical components in making sure fire protection systems operate optimally, don't sag and maintain a sightly appearance.
Here are 10 tips to help with hanger installation:
- Comply with regulations and manufacturer guidelines. There are many UL-listed hangers designed specifically for use with BlazeMaster pipe and fittings. (NFPA 13 and 13R require listed hangers for fire sprinkler systems, while NFPA 13D does not).
- Stabilize the pipe to prevent kickback when activated. BlazeMaster pipe and fittings are lighter than steel, so designing hangers to prevent kickback when activated is important to ensure the sprinkler's spray pattern isn't compromised. Also consider:
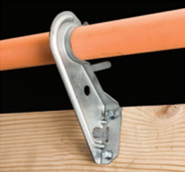
- Using threaded rod to prevent kickback with swivel loop hangers, but the threaded rod should not touch the pipe.
- Making sure the threaded support rod is positioned to 1/16 in. (1.56 mm) above the pipe.
- Securing the pipe with surge clips in lieu of cutting threaded rod.
- Ensure hangers do not prevent the pipe from moving and are free of rough, sharp edges. Hangers must allow some degree of movement to accommodate expansion and contraction as well as motion during activation. The smooth, tapered edges of UL-listed hangers won't damage BlazeMaster CPVC pipes.
- Use the right size hangers. A hanger that is too small can create unwanted stress on the pipe.
- Use standoff and double offset hangers in wood-frame construction. These types of hangers keep the pipe 1-1/2” away from where the hanger is mounted, making it easier to work around obstructions.
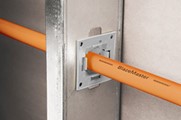
- Use snap-in or easy snap grommets when BlazeMaster CPVC pipe runs through metal studs. These grommets push into holes in metal studs for a secure fit; therefore, they don't require cutting or mounting tools and ultimately save time for installers. The grommets also stabilize the pipe and keep it from rubbing up against the potentially damaging sharp edges found on metal studs.
- For retrofits, use hangers that mount directly to the wall or ceiling. The Tolco Fig 22L2 is an ideal solution for mounting pipe directly to a wall or ceiling. These one-hole hangers wrap around the pipe and keep it off the wall, making solvent-cement application easier. The pipe can also be rotated so it can be placed close to a CPVC fitting without compression that could cause cracking.
- Cut pipe with an appropriate tool that can achieve a straight edge. A small battery-powered reciprocating saw with a metal blade is a good option and can be used in any weather condition as can tubing cutters with a plastic-cutting wheel, which also can be used in all weather conditions. Ratchet cutters and deburring tools have also improved in recent years.
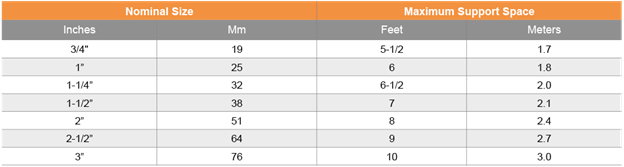
- Use the right spacing. Refer to manufacturer guidelines for exact information on how far apart CPVC supports should be, but it is generally recommended to follow the table below to find the maximum distance between supports and hangers.
- Plan for thermal expansion. As external and internal temperatures change, piping systems may expand and contract, placing unnecessary stress on the system if there is no mechanism in place to deflect it. When planning for thermal expansion, reference this calculator to design around and alleviate temperature-related concerns.